PJ Smith from United Christian Youth Camp (UCYC) in Prescott, AZ brings us this great LED strip design.
From PJ:
The Goal:
For our 2021 Stage Design, the goal was to recycle as many materials as possible, specifically LED strips we had on hand. Another key factor was how easily the design could be repeated. UCYC will run 3 different camps simultaneously, which means 3 stage builds. The design had to easily translate to the nuances between each of our venues.
The Inspiration:
As I’m sure is the case for many of us, the inspiration for this design came from CSDI. This was my first design for UCYC, so I spent hours scrolling through CSDI looking for inspiration that fit the context of what I was looking for. I came across “Highlight Strips” by Francesco Carbone and Jeff Muir from OneChurch.to and knew exactly what we would do.
LED Strips are a common ingredient in our designs, so we had plenty of strips and decoders on hand and available. A friend at Prescott Christian Church (creators of “Echoing String”) turned me on to aluminum diffuser channels from amazon after I had shared the rough idea with him.
The Design:
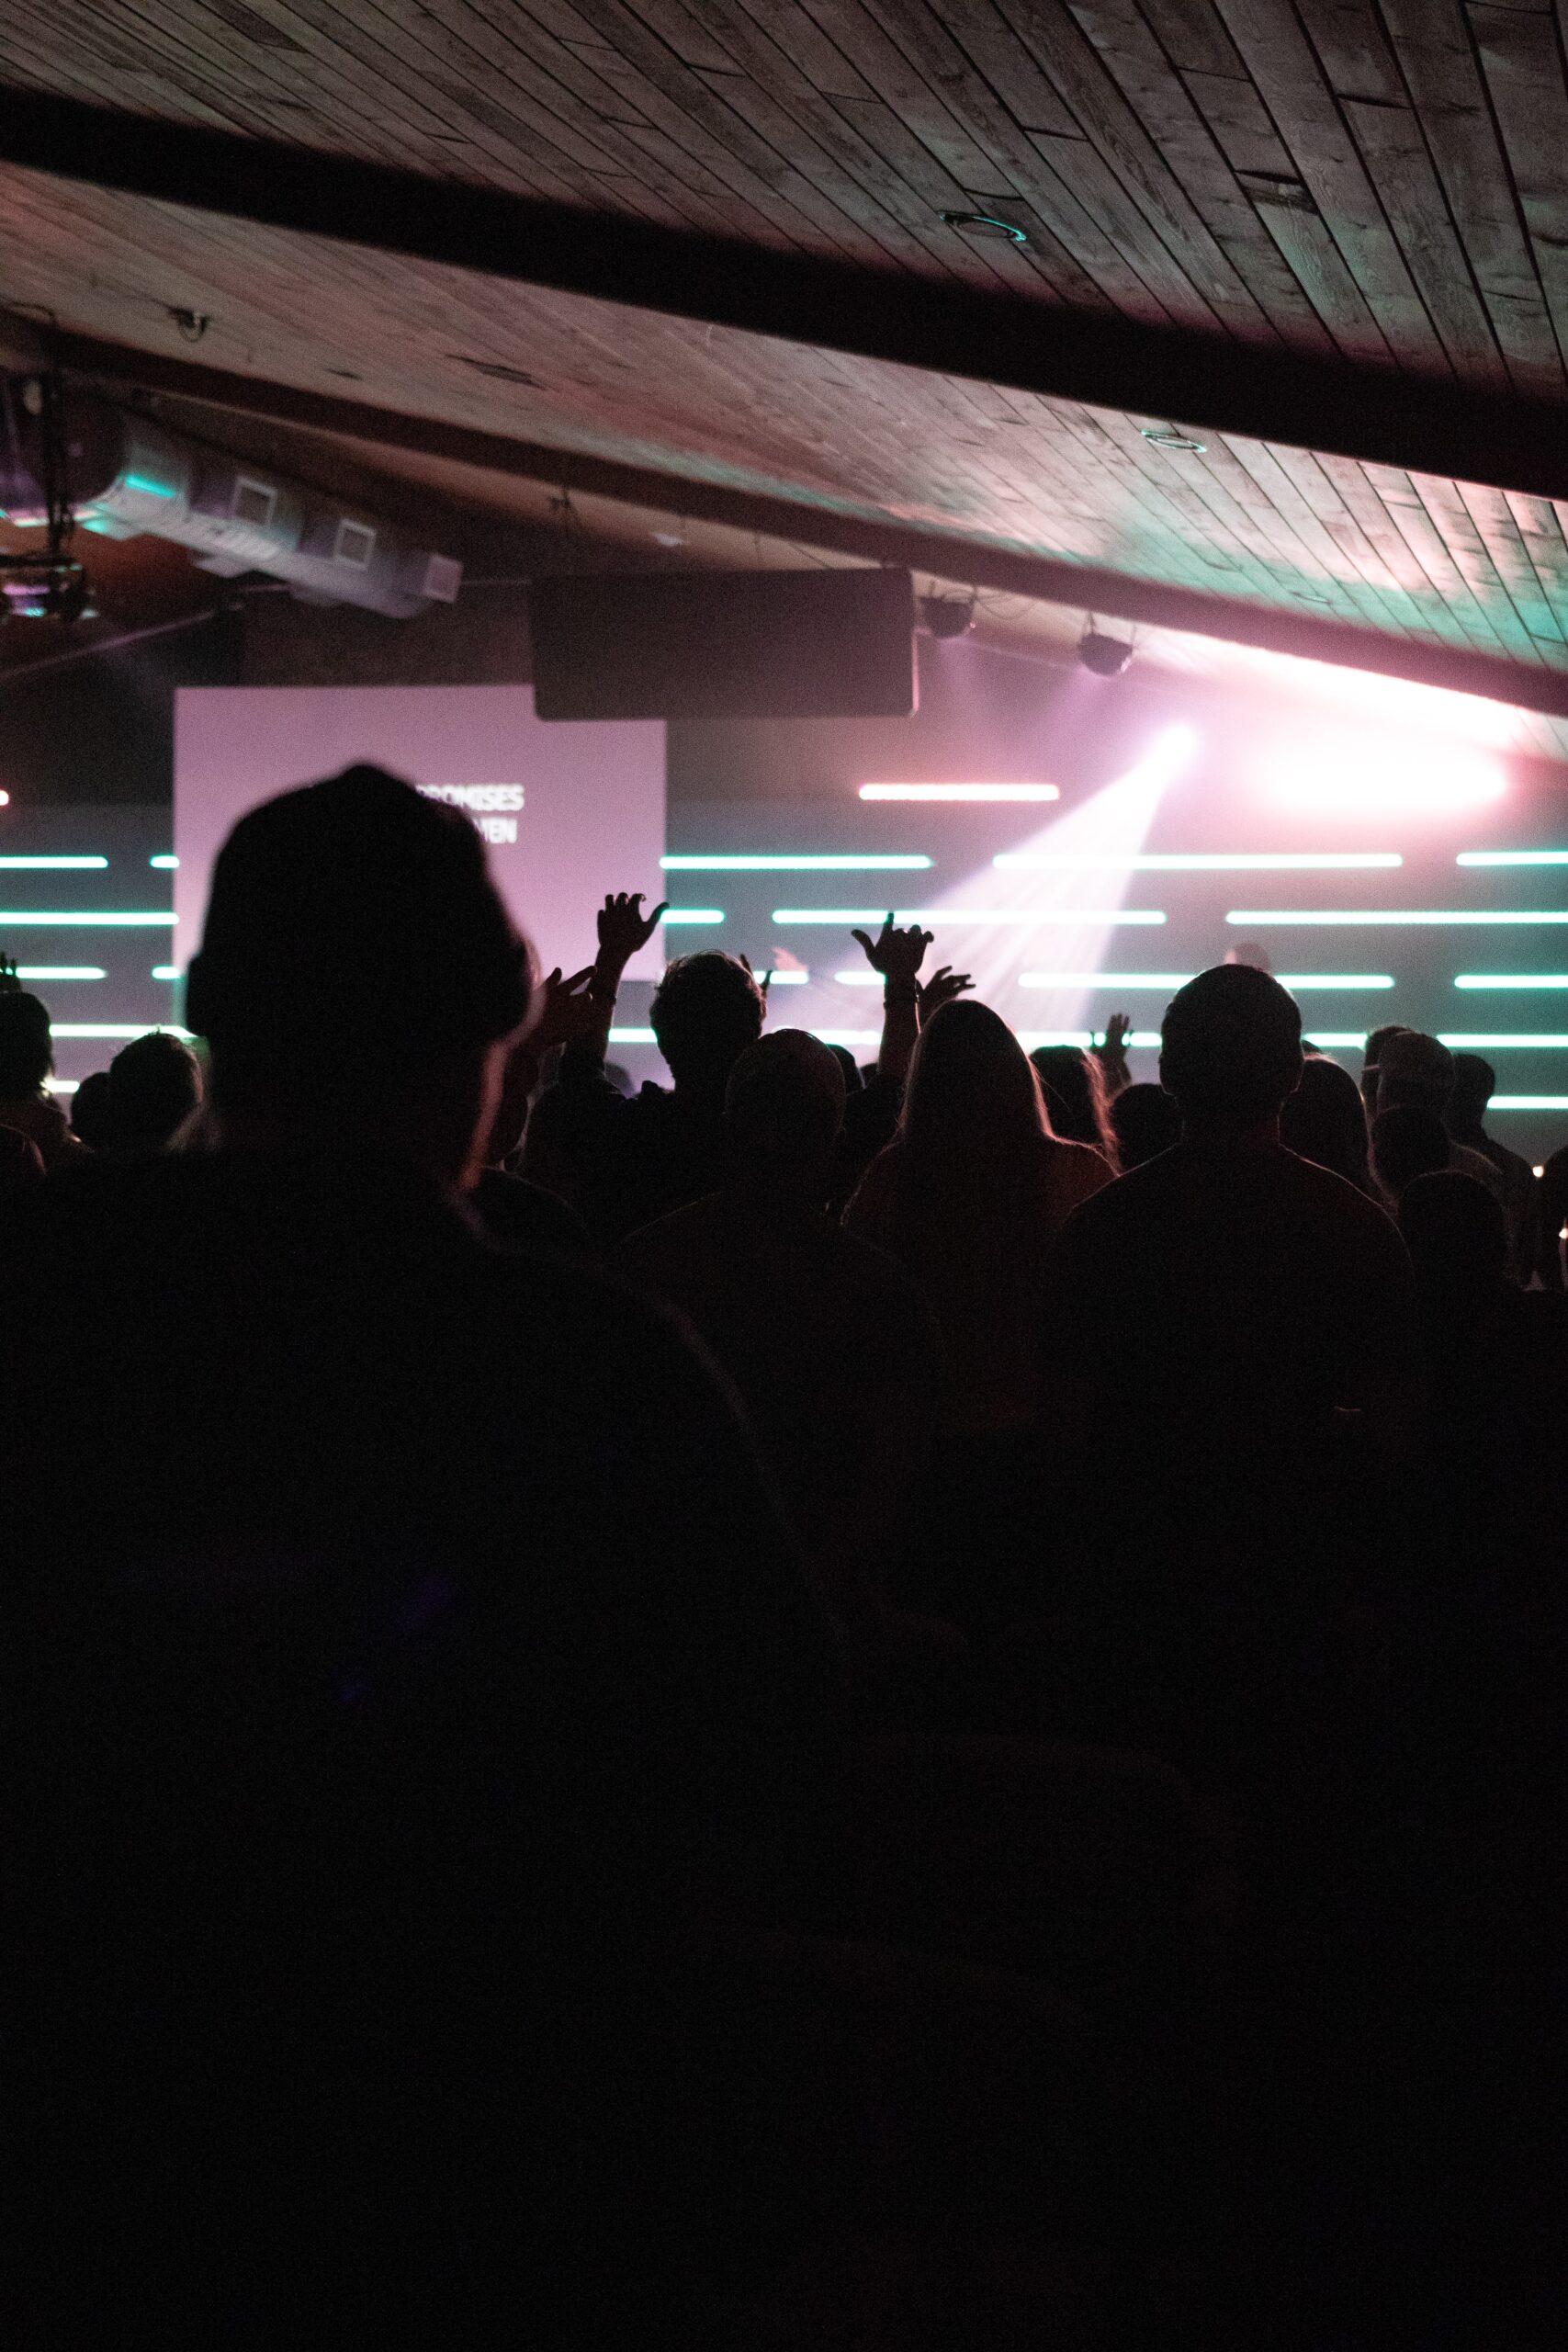
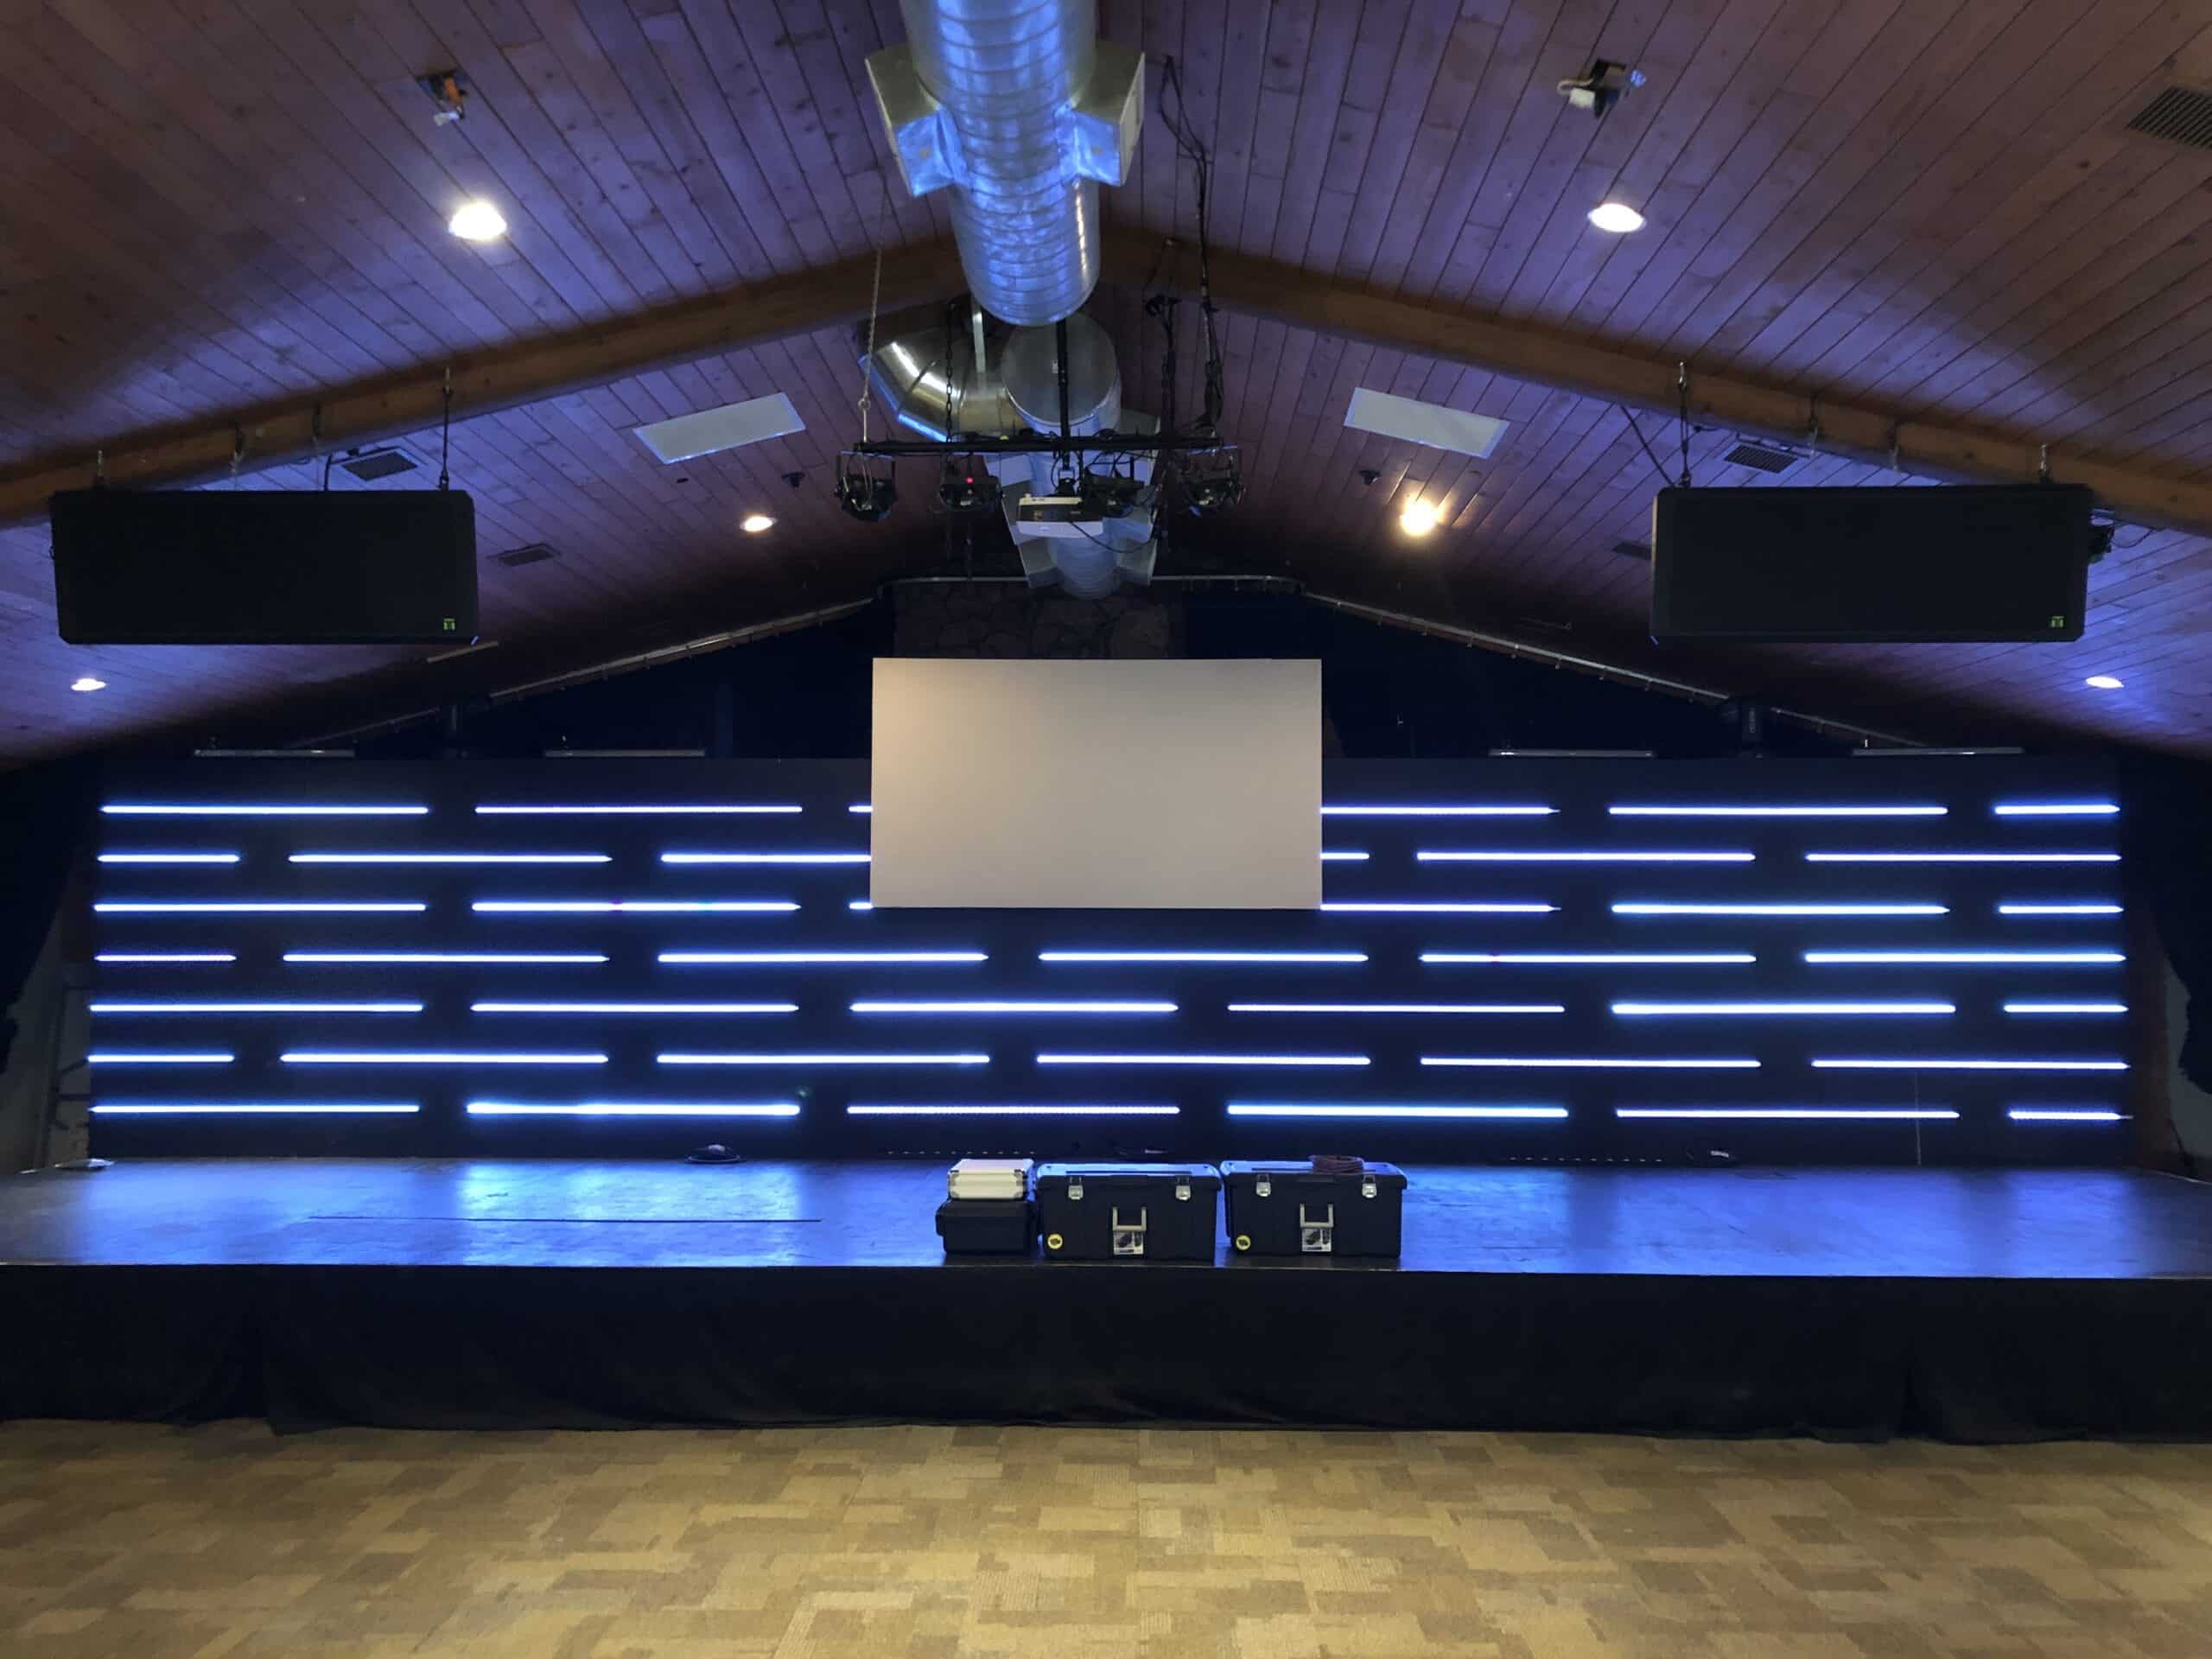
The plan was to layout 7 rows of diffused LED strips in a continuous/alternating pattern from one end of the stage to the other (40′ Wide x 8′ Tall). I would then place 2 generic LED bars and 2 generic movers on top of the back wall on each side of our main display. I created mock-ups of the stage in an app called Procreate on my iPad pro to help visualize the design.
The final design showed that we would end up with 42 individual sections of LED strips on the back wall, so the next goal was to have individual control of each LED Strip, allowing for maximum flexibility in the lighting design. As I mentioned before, we’ve been using LED strips for years and have plenty of decoders on hand. Once the design on the front was complete, I began designing the back side of the stage.
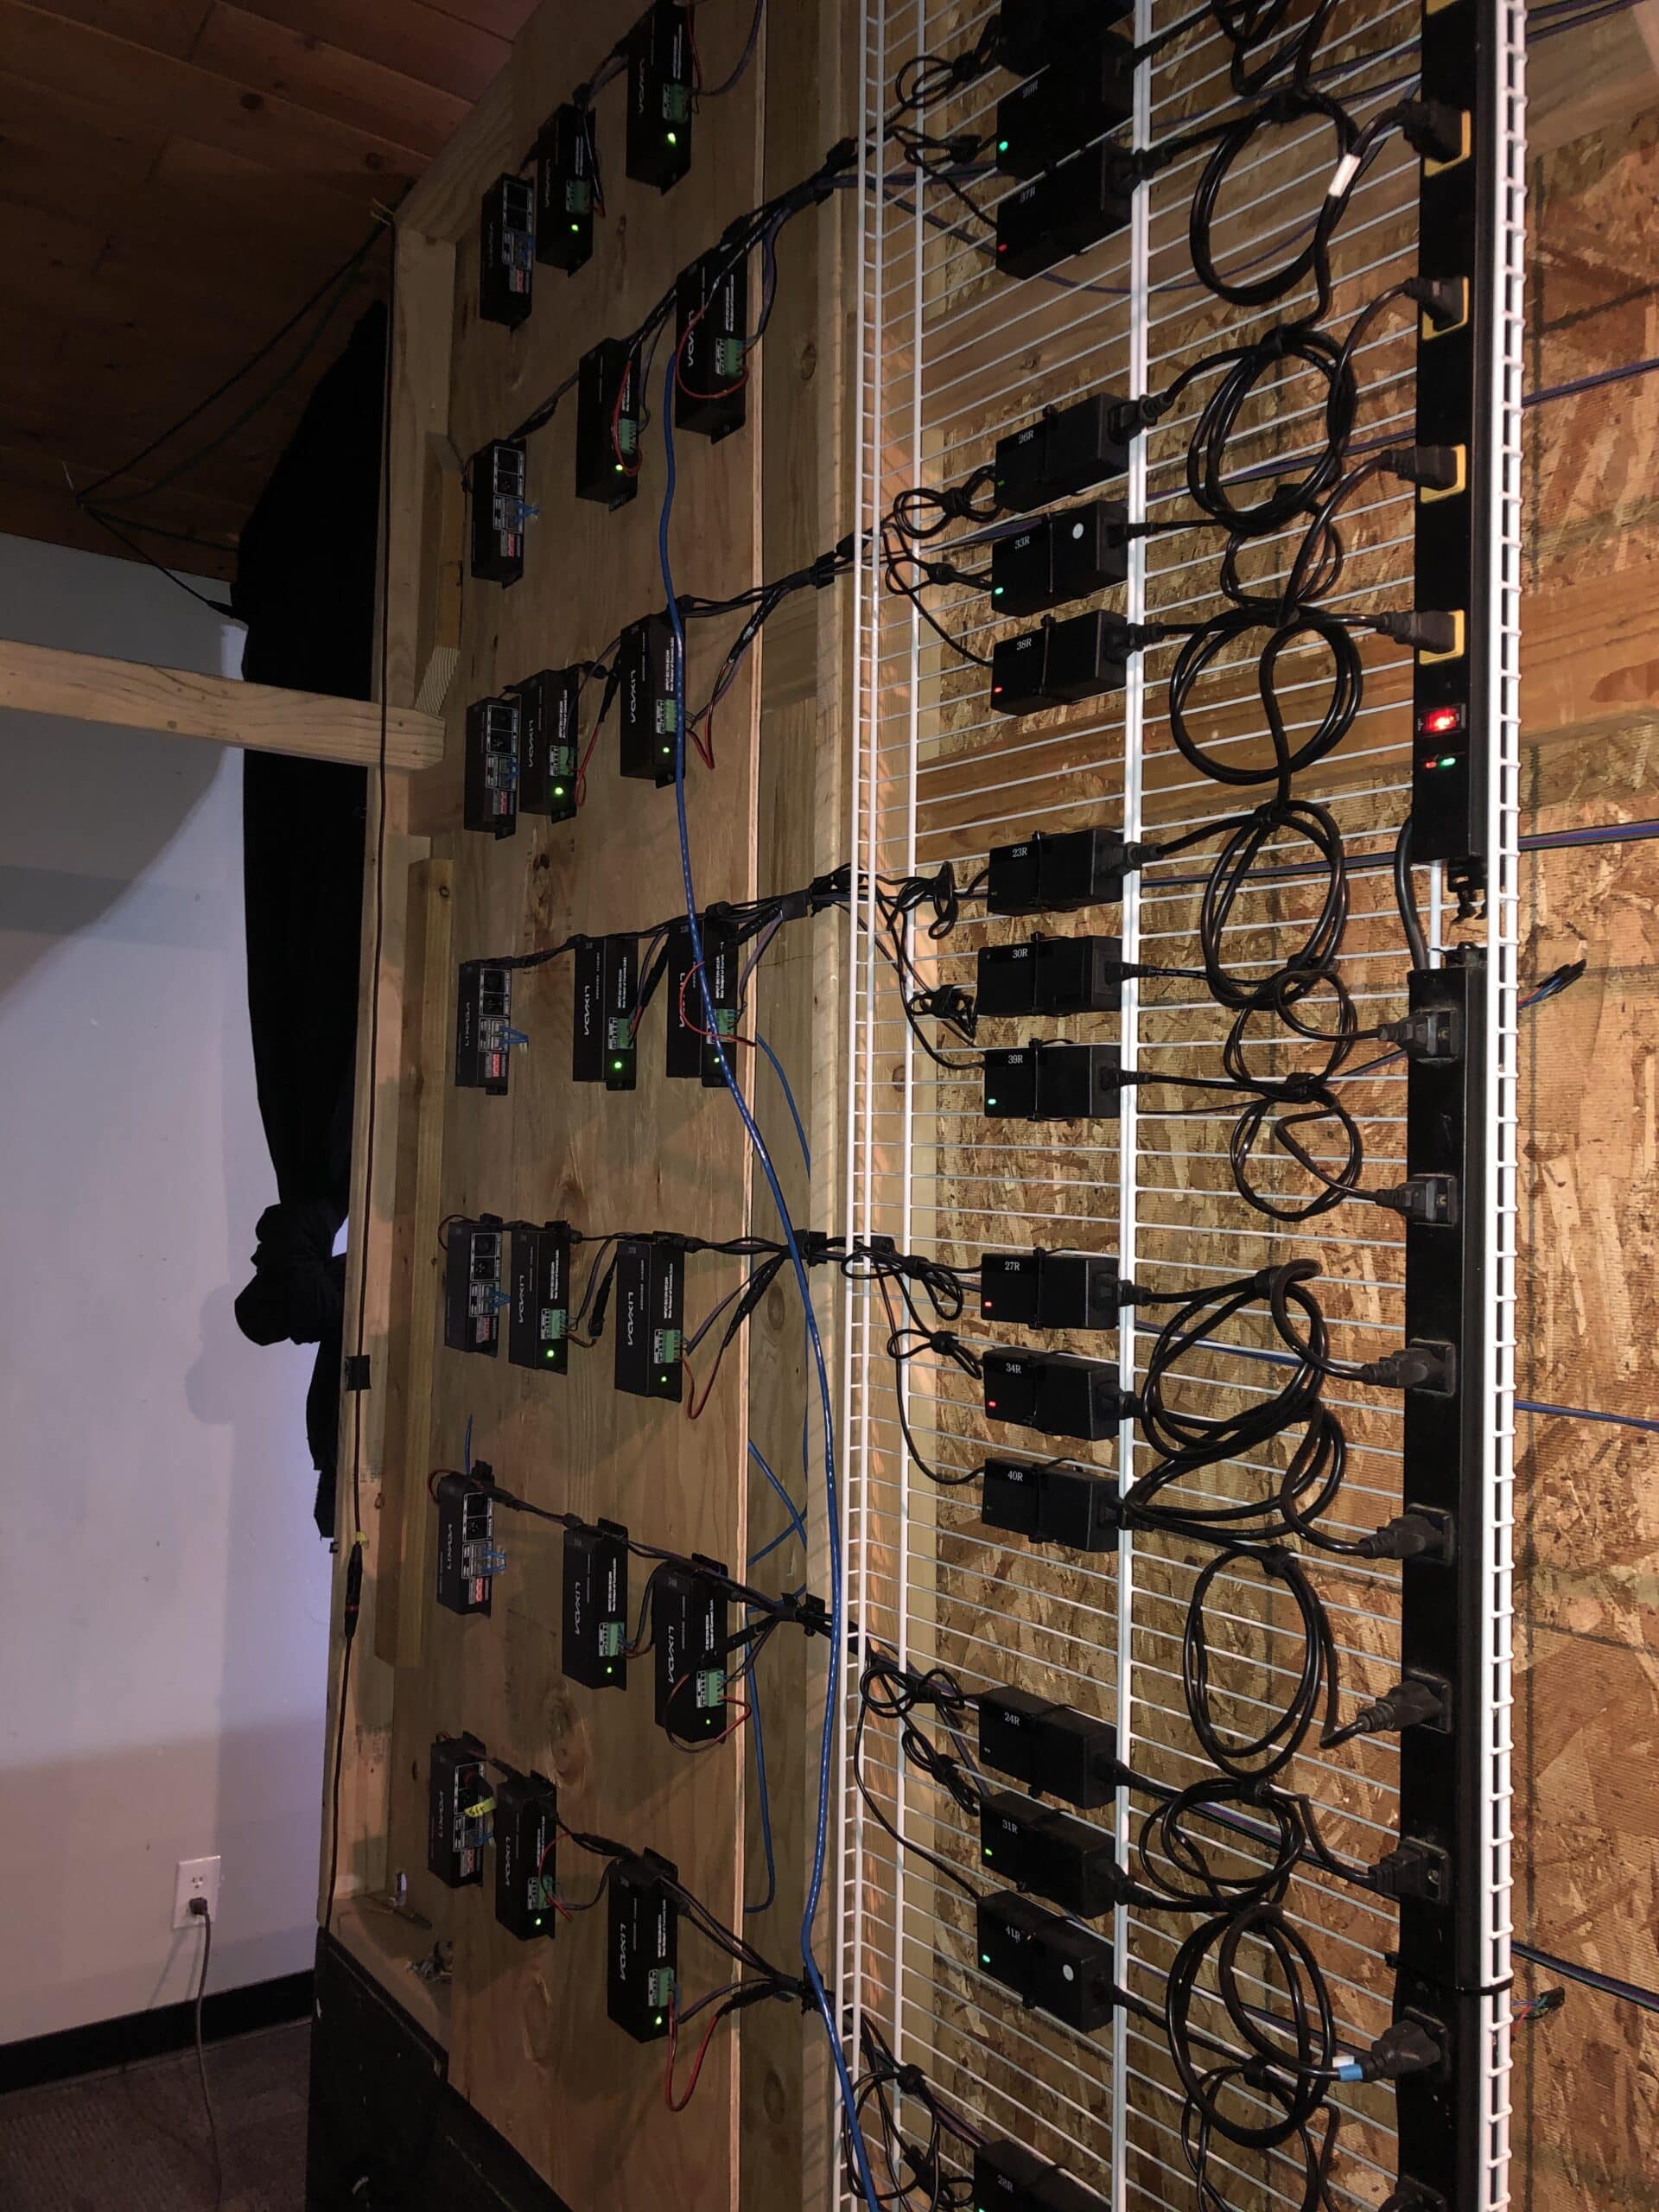
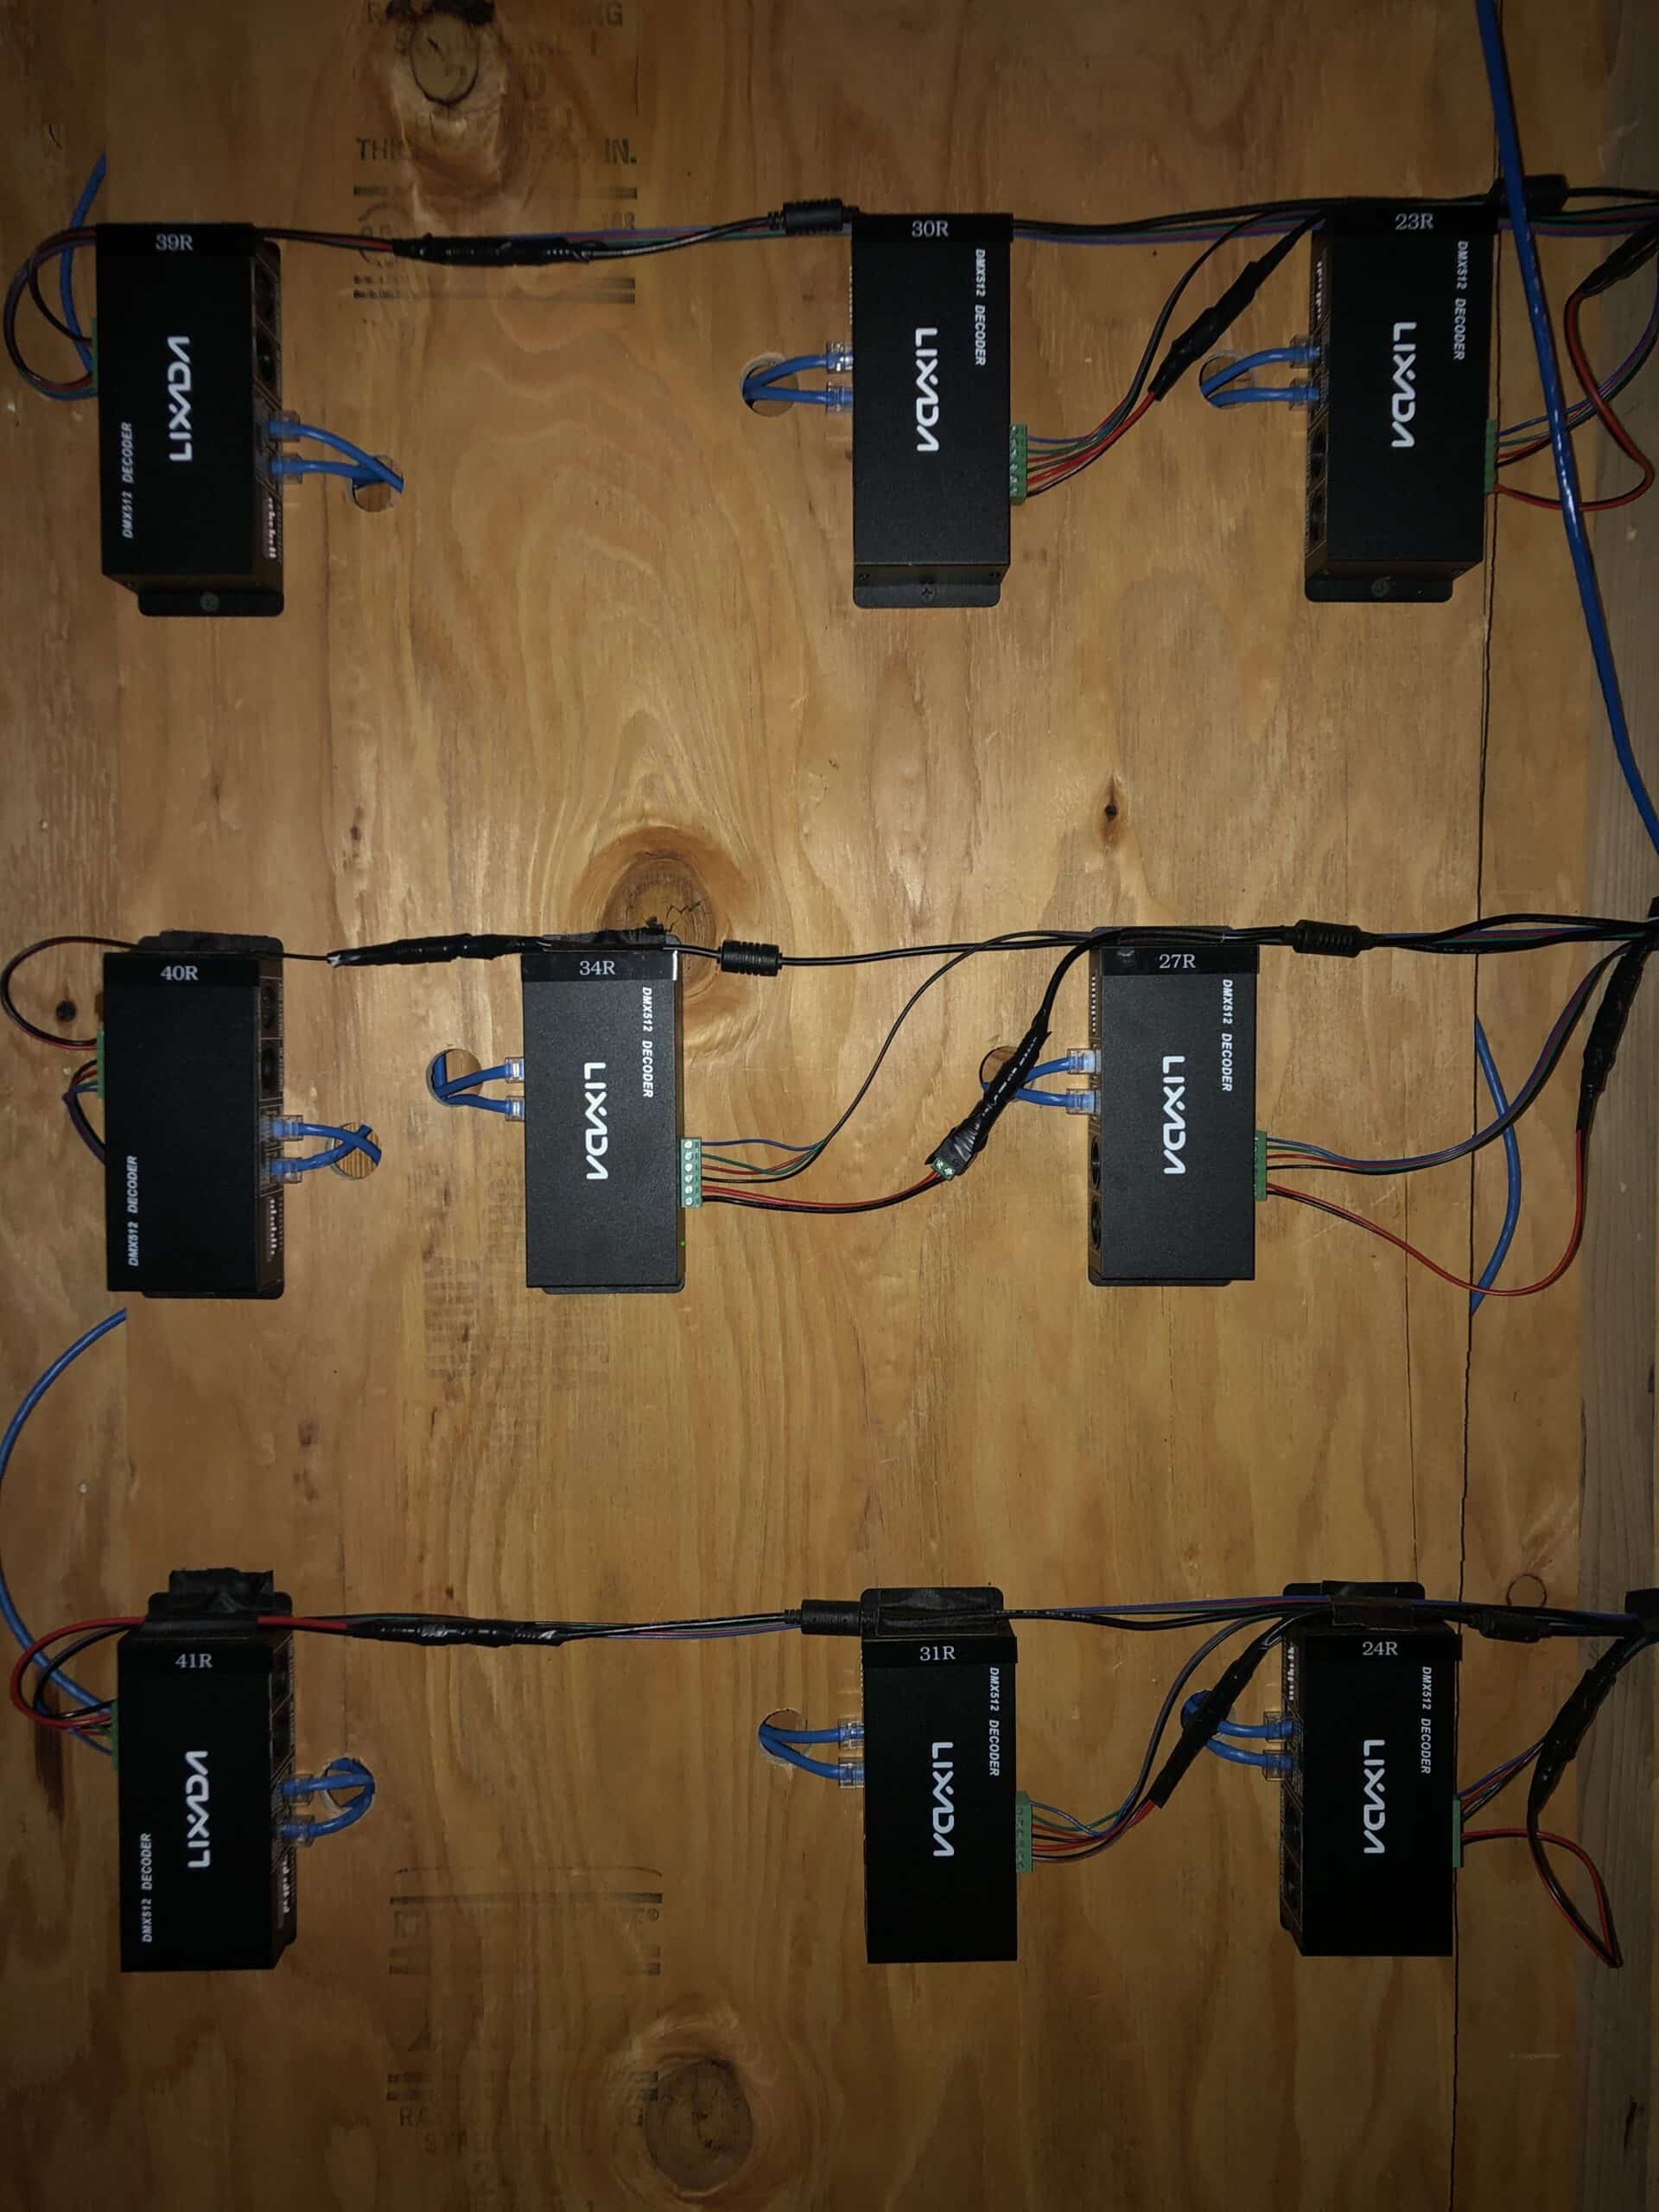
In effort to make the stage side as clean as possible, I bought approximately 300 feet of RGB wiring on amazon and soldered enough cable to go from the strip on stage through a small hole drilled in the back wall to a panel that would hold all of the decoders and power supplies. In order to keep things organized on the back wall, I used wire shelving racks and plywood to create a “grid” of sorts against the back stage wall that would hold all of the decoders and power supplies. In the name of organization, each LED strip/channel, decoder, and power supply was labeled with a correlating “nickname” (1L, 22R, etc.).
Rather than purchase the additional DMX cable we would need, the decoders were connected to each other using homemade CAT6 cables (bulk cable & RJ45 connectors purchased on Amazon). In effort to keep the decoders easy to maintain, a 1″ hole was drilled into the plywood holding the decoders next to each connection point, allowing the +20 CAT6 cables to be run on the backside of the panel.
Budget:
Given that the supplies for multiple designs were purchased and that many of the costly portions of the design were already on hand, it is difficult to provide an exact cost for a single design like this. An approximate cost for this exact design would be between $2,000 and $2,500 (including LED strips, aluminum channels, decoders, and the various cables purchased).
Lighting Equipment details:
-All lights programmed & controlled through Light Key on an Apple Mac Mini (1 universe)
-42 LED strip/channel “Fixtures”
-4 Generic LED bars
-4 Generic Moving Head Fixtures
-8 ADJ Mega Tripar Profile Plus (front stage wash)
Supplies:
-Decoders (https://www.amazon.com/Lixada-12V-24V-Channel-Decorder-Controller/dp/B00B42M3RG?dchild=1&keywords=decoder%20led%20tape&qid=1616478754&sr=8-5&linkCode=sl1&tag=csdi-20&linkId=cd3c78bc5024b026eddf8249d39818e2&language=en_US&ref_=as_li_ss_tl)
-LED Strips (https://www.amazon.com/SUPERNIGHT-Waterproof-300LEDs-Changing-Flexible/dp/B00DTOAWZ2?crid=2O7P4PBID01MC&dchild=1&keywords=supernight%20led%20light%20strip&qid=1616478821&sprefix=supernight,aps,218&sr=8-2-spons&psc=1&smid=AXEJGN8WLZD9M&spLa=ZW5jcnlwdGVkUXVhbGlmaWVyPUFPWUdPR1ozWUpXUVgmZW5jcnlwdGVkSWQ9QTAzNDA0NTUzS1VFSEpWUk9GU01XJmVuY3J5cHRlZEFkSWQ9QTAyMjQ0MDEyV1BNNDc1RDJZSDhQJndpZGdldE5hbWU9c3BfYXRmJmFjdGlvbj1jbGlja1JlZGlyZWN0JmRvTm90TG9nQ2xpY2s9dHJ1ZQ==&linkCode=sl1&tag=csdi-20&linkId=83d24354601024350d3e6531938aa20e&language=en_US&ref_=as_li_ss_tl)
-12v Power Supplies (https://www.amazon.com/gp/product/B008FKDK2M?ie=UTF8&psc=1&linkCode=sl1&tag=csdi-20&linkId=b5ef2005da03eba75b7e5c617a2839a7&language=en_US&ref_=as_li_ss_tl)
-LED Strip Aluminum Channels (https://www.amazon.com/gp/product/B07RC82CJC?ie=UTF8&psc=1&linkCode=sl1&tag=csdi-20&linkId=fdfc87c662a17f2fa16354730fad7a5a&language=en_US&ref_=as_li_ss_tl)
-RGB Cable (https://www.amazon.com/gp/product/B07FDW4M89?ie=UTF8&psc=1&linkCode=sl1&tag=csdi-20&linkId=37960af2daaa8011fd920459472ffd98&language=en_US&ref_=as_li_ss_tl)
-Bulk CAT6 Cable (https://www.amazon.com/gp/product/B00YZ5KWOK?ie=UTF8&psc=1&linkCode=sl1&tag=csdi-20&linkId=847c3c76fe5ae72c760c09f975a2038e&language=en_US&ref_=as_li_ss_tl)
Things I would change:
-As I mentioned, the name of the game was recycling and repurposing. However, through the use of different LED strips there is a slight difference in the number of light nodes on each strip that can be seen even through the diffused channels.
-I didn’t have the idea to use the wire shelves for hardware mounting until after I had purchased plywood for the decoders. If I were to do this over again I would certainly use wire shelves for that as well.
-There are plenty of decoders on the market that would have allowed us to run several LED strips into a single decoder while maintaining individual control of each strip, which would have been that much less hardware to maintain. However, we had plenty of the single channel decoders on hand so I chose to just use those.


Leave a Reply
You must be logged in to post a comment.