Drew Hoopingarner and his team from Southport Presbyterian Church in Indianapolis, IN wanted to create a cathedral look for their worship center for the Advent Season.
They started off by having the artist on the team draw the design of each of the stained glass windows. She drew them to scale so they were 6”x12” on paper, but in real life they would be 6’x12′. She also colored in her drawings to create a key for adding the colored panels to the stained glass.
Tree – History – Matthew (130 cutouts)
Cross – Repentance – Mark (90 cutouts)
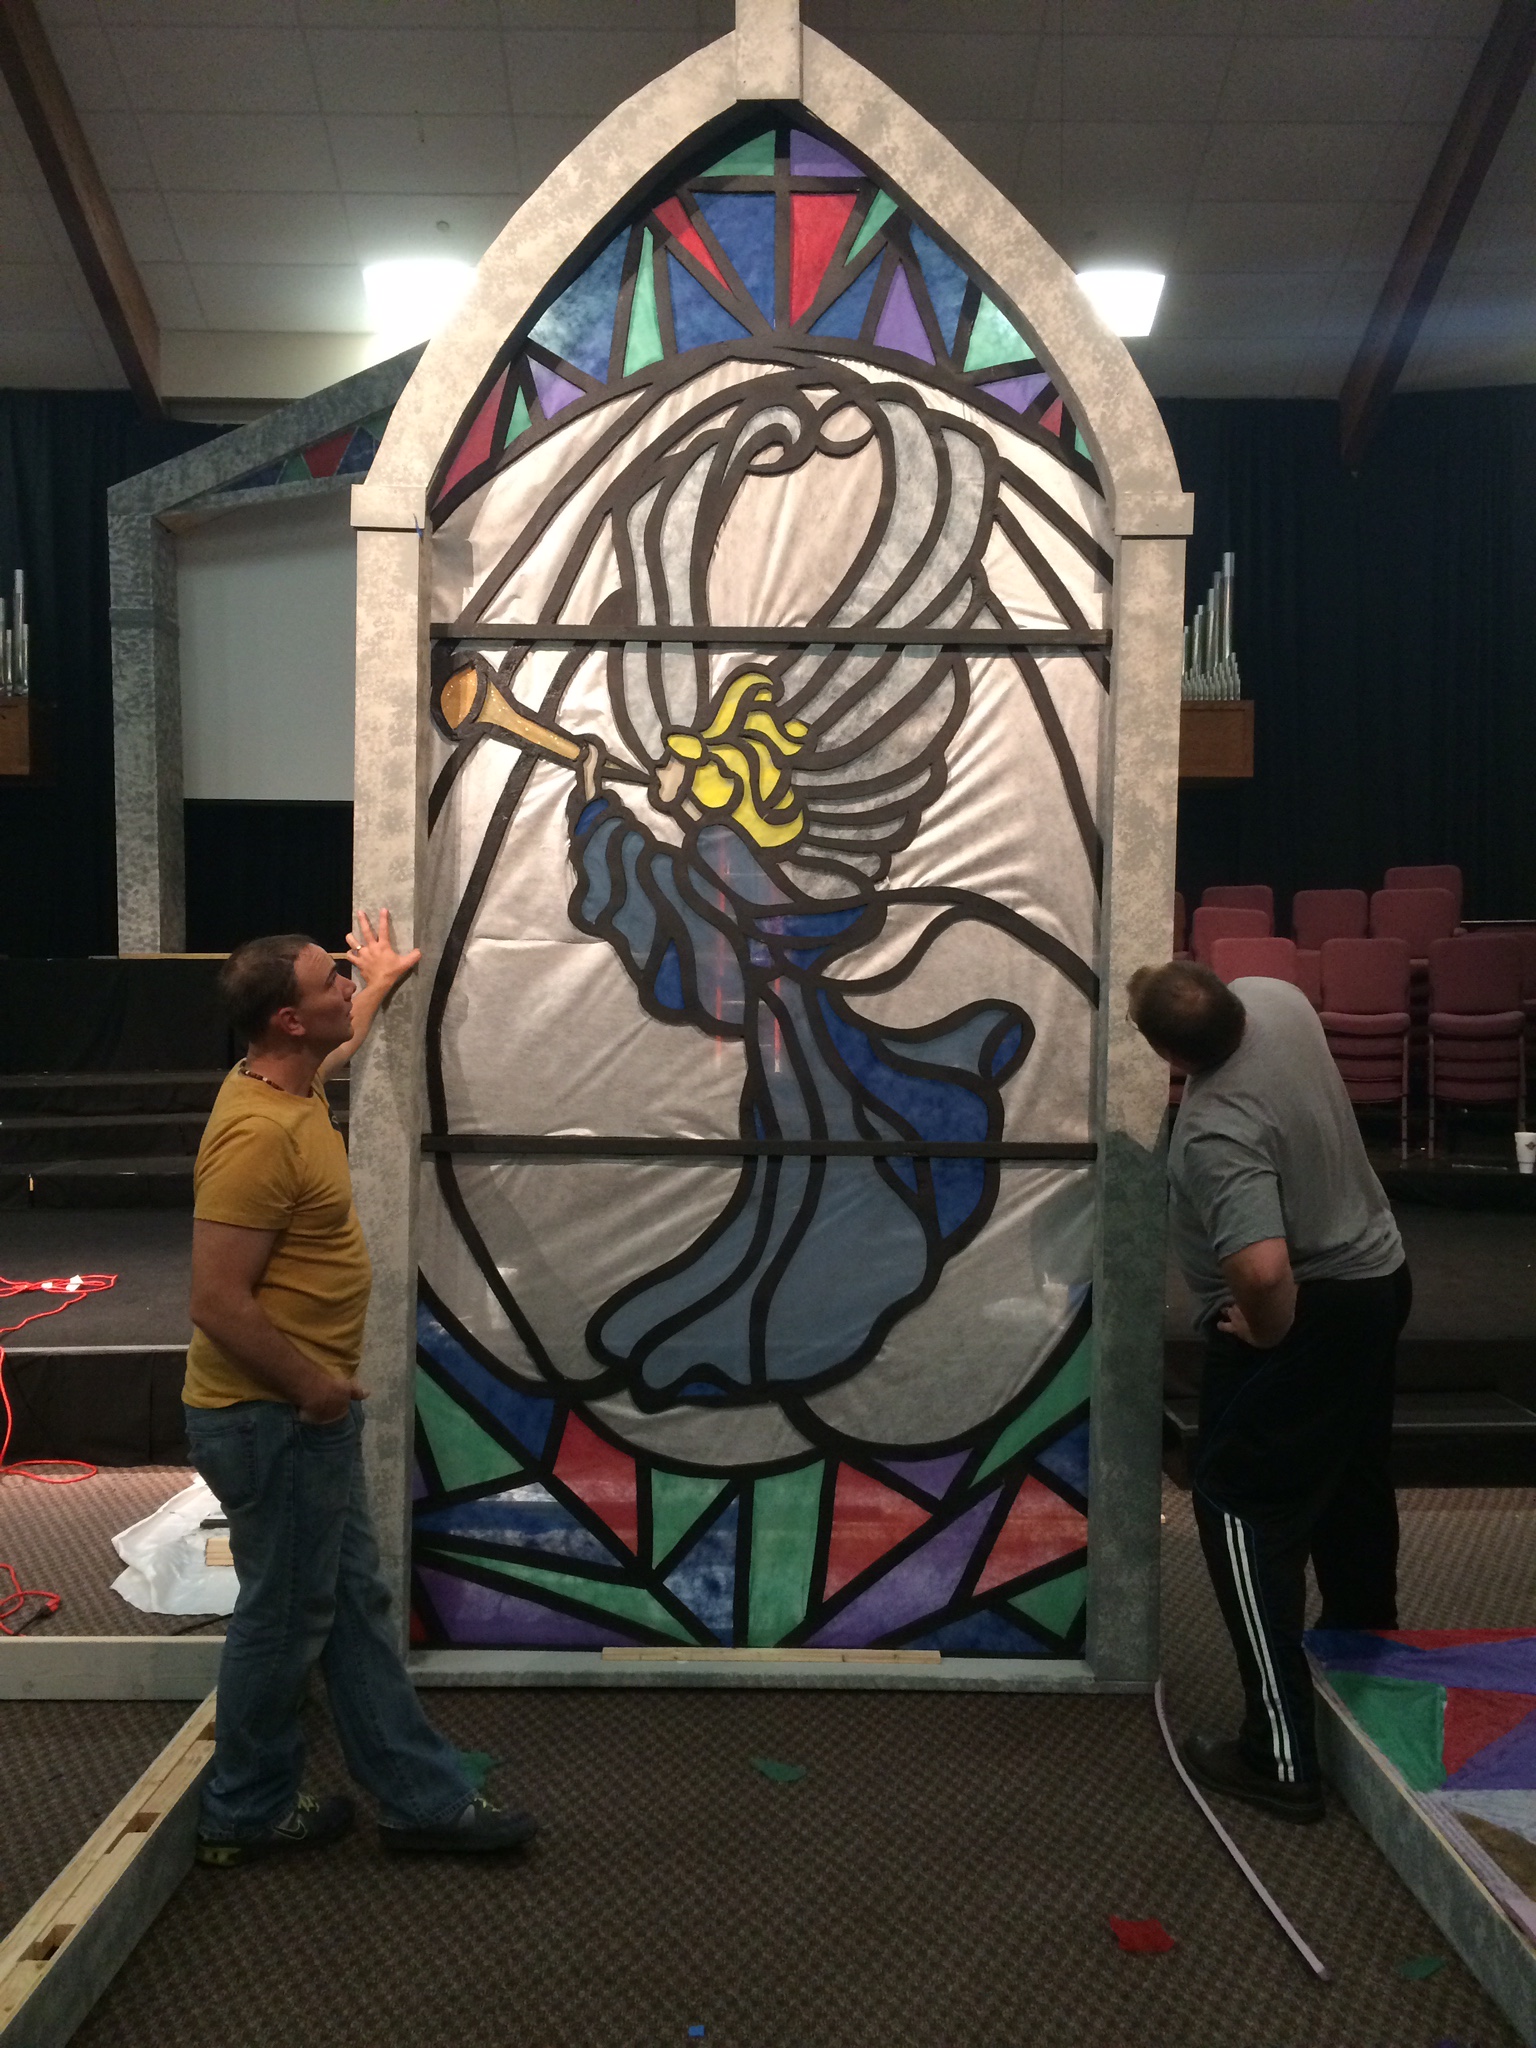
Angel – Worship – Luke (118 cutouts)
Hands – Relationship – John (115 cutout)
The next step was to take those images and split them into three sections horizontally. This way, they could trace the images on ½” pink insulation foam. In the end, each window had three pieces of foam stacked horizontally on top of each other. After they traced the foam pieces, they took a jig saw with a fine blade and cut out all of the shapes that would create the stained glass. Then they spray painted the whole window black so it would look like the lines in stained glass.
While they worked on that, a separate team built the frames for the windows. They used plywood, 2×4’s, melamine board, and lots of screws. The frames were built in two halves then fastened together once they got them in the room. They were about 7′ wide by 13′ tall. The frames were 3D so each side was about 6”x6”x4”. The frames were painted with a light grey paint and sponged with a darker grey paint to give texture. They added a piece of 2×6 to the bottom of each of the windows to keep the two halves together and so they could mount to the stage.
Meanwhile back at the windows, the team was busy putting material behind each part of the stained glass. They used a material called gossamer from http://www.shindigz.com/party-supplies/party-decorations/decorating-fabrics/gossamer/15021. Using a low temp hot glue gun, they cut each shape and glued the material to the frame. They played around with doubling some of the colored fabrics to create more vibrant colors and avoid transparency.
After the windows and frames were done, they fit the foam pieces into each of the frames. Where the pieces of foam came together, they added a piece of 1×2 painted black to hide the seam. They fastened the foam pieces with drywall screws and washers to the back of the wood frame. Lastly, they added a white paint tarp over the back to achieve the desired lighting effect.
The big arch in the middle was made to fit around our screen. The arch was about 14′ wide and 15′ tall. They taped the arch out on the floor and then used plywood and 2×4’s to build it. They added the stained glass at the top and bottom to tie everything together. They mounted LED light bars on the inside of the arch where the stained glass was to make it light up.
The final touch to the project was perfecting the lighting. They used 4 – 75 watt flood lights behind each of the windows. Then they used round LED lights to up light each side of the windows.
This project was a big undertaking for the team. They started working on this at the beginning of October and worked every weekend all the way up to Thanksgiving. There was well over 450 hours put in on this set. The cost of the set was about $650-$700.
Creating Cathedral-Style Stained Glass Stage Designs
Stained glass windows have been a cornerstone of sacred architecture for centuries, evoking a sense of reverence and wonder that transforms ordinary spaces into extraordinary worship environments. This ambitious project from Southport Presbyterian Church demonstrates how modern churches can capture that timeless cathedral aesthetic using accessible materials and volunteer labor. The result is a breathtaking focal point that elevates the worship experience while remaining budget-friendly.
The four symbolic window designs carry deep theological significance that resonates throughout the Advent season and beyond. The Tree representing History and Matthew’s gospel connects the congregation to their spiritual roots, while the Cross symbolizing Repentance and Mark’s account calls believers to reflection. The Angel embodying Worship and Luke’s narrative celebrates the heavenly host, and the Hands signifying Relationship and John’s gospel emphasize the personal connection between God and His people. This intentional symbolism transforms the stage from mere decoration into a teaching tool that reinforces biblical themes week after week.
The construction methodology showcases smart problem-solving that any church volunteer team can replicate. Using pink insulation foam rather than traditional glass eliminates both weight and safety concerns while dramatically reducing costs. The material is easy to cut with basic tools, forgiving of mistakes, and surprisingly durable when properly framed. Churches considering similar projects should note that the 450+ hours invested here reflect the intricate detail work of 453 individual cutouts across all four windows. Simpler designs with fewer pieces could achieve similar visual impact with significantly less labor.
Lighting design proves crucial to the success of any stained glass project. The combination of rear flood lighting and side LED up-lighting creates depth and dimension that makes the colors glow from within. The white paint tarp backing serves as an essential reflector, bouncing light back through the gossamer fabric to maximize brightness. Churches implementing similar designs should experiment with color temperature, as warm white lights (2700-3000K) create a traditional sanctuary feel while cooler temperatures (4000-5000K) offer more contemporary aesthetics.
Related Designs
- Stained Wood – Discover how to create elegant wood panel stage designs using stain techniques that add warmth and sophistication to your worship space.
- Color Tiles – Learn how to build colorful geometric stage backdrops using lightweight Coroplast tiles that create stunning visual impact on a budget.
- Geometric Stained Glass – See how modern geometric patterns can create contemporary stained glass effects using LED light boxes and acrylic panels.
- Fabric Backdrop Ideas – Explore various fabric-based stage designs that offer versatility and easy installation for changing seasonal themes.
- Light Boxes – Learn how to construct illuminated stage elements using LED strips and diffusion panels for dramatic backlit effects.
Pro Tips for Stained Glass Stage Projects
Plan Your Symbolism Carefully: Before cutting a single piece of foam, invest time in choosing symbols that resonate with your congregation’s theology and the liturgical season. Consult with your pastoral team to ensure the imagery aligns with teaching themes. Consider how the design will photograph for social media and live streaming, as many congregants now experience services primarily through screens.
Test Your Fabric Colors: Gossamer and similar translucent fabrics can look dramatically different under stage lighting than they appear in natural light. Purchase samples and test them with your actual lighting rig before committing to final colors. Layering fabrics creates richer, more saturated hues but also reduces light transmission, so find the right balance for your venue.
Build Modular Frames: The two-half frame construction used here is brilliant for churches with limited access doors or tight stage wings. Design your frames to fit through your narrowest doorway with a few inches to spare. Label each half clearly and create alignment marks so reassembly is foolproof for volunteer teams.
Consider Storage and Reuse: Quality stage designs deserve multiple seasons of use. Build storage crates that protect your investment during off-season months. Photograph the fully assembled design from multiple angles before disassembly to create a reference guide for future installation teams. Documenting the build process with photos and notes makes replication or modification much easier next year.


Related: Taste the Rainbow – Discover how to create a stunning wavy Coroplast backdrop with offset studs for dynamic stage lighting effects.
Related: Falling on My Stage – Discover how to create a stunning layered foam card stage design with custom light towers and dynamic LED lighting.


This is absolutely wonderful! I work at a facility with handicapped individuals. we are looking for a set for our upcoming Christmas program. I have very little to spend. How expensive and how hard was this to complete. We all just love it.