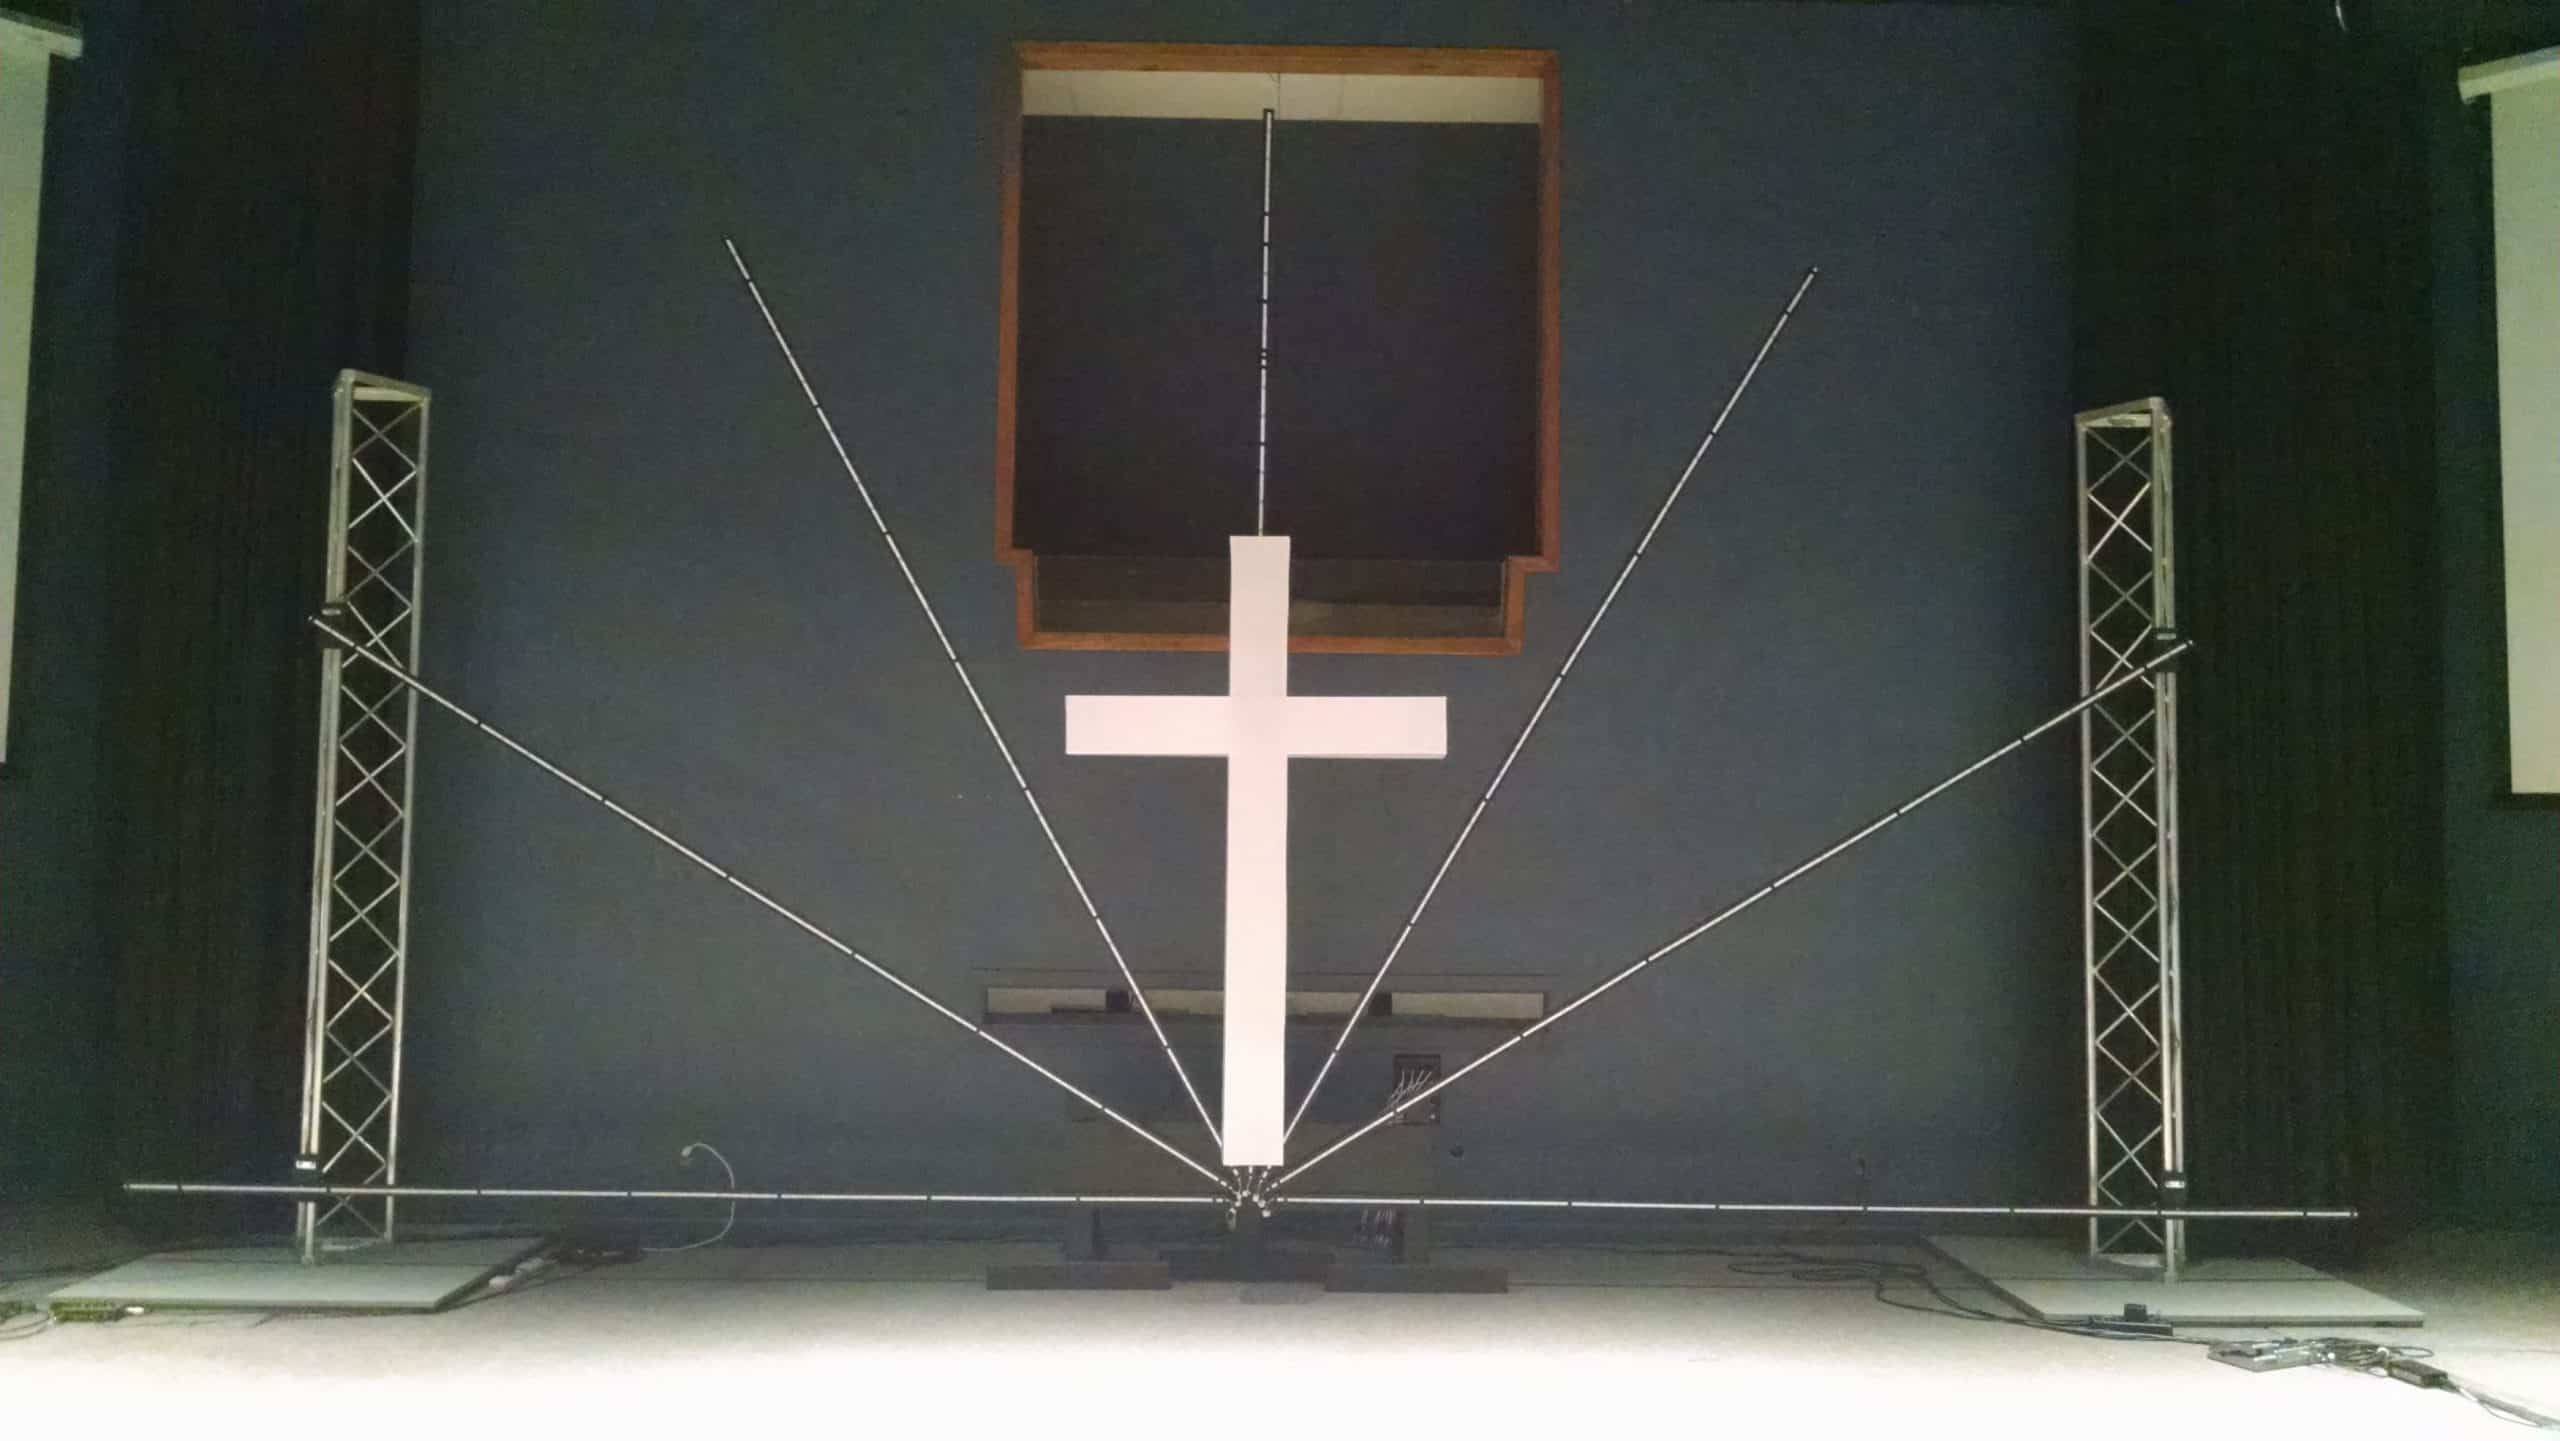
Lance Rosenthal from Faith Center in Rockford, Illinois brings us this LED tape-backed cross for their stage.
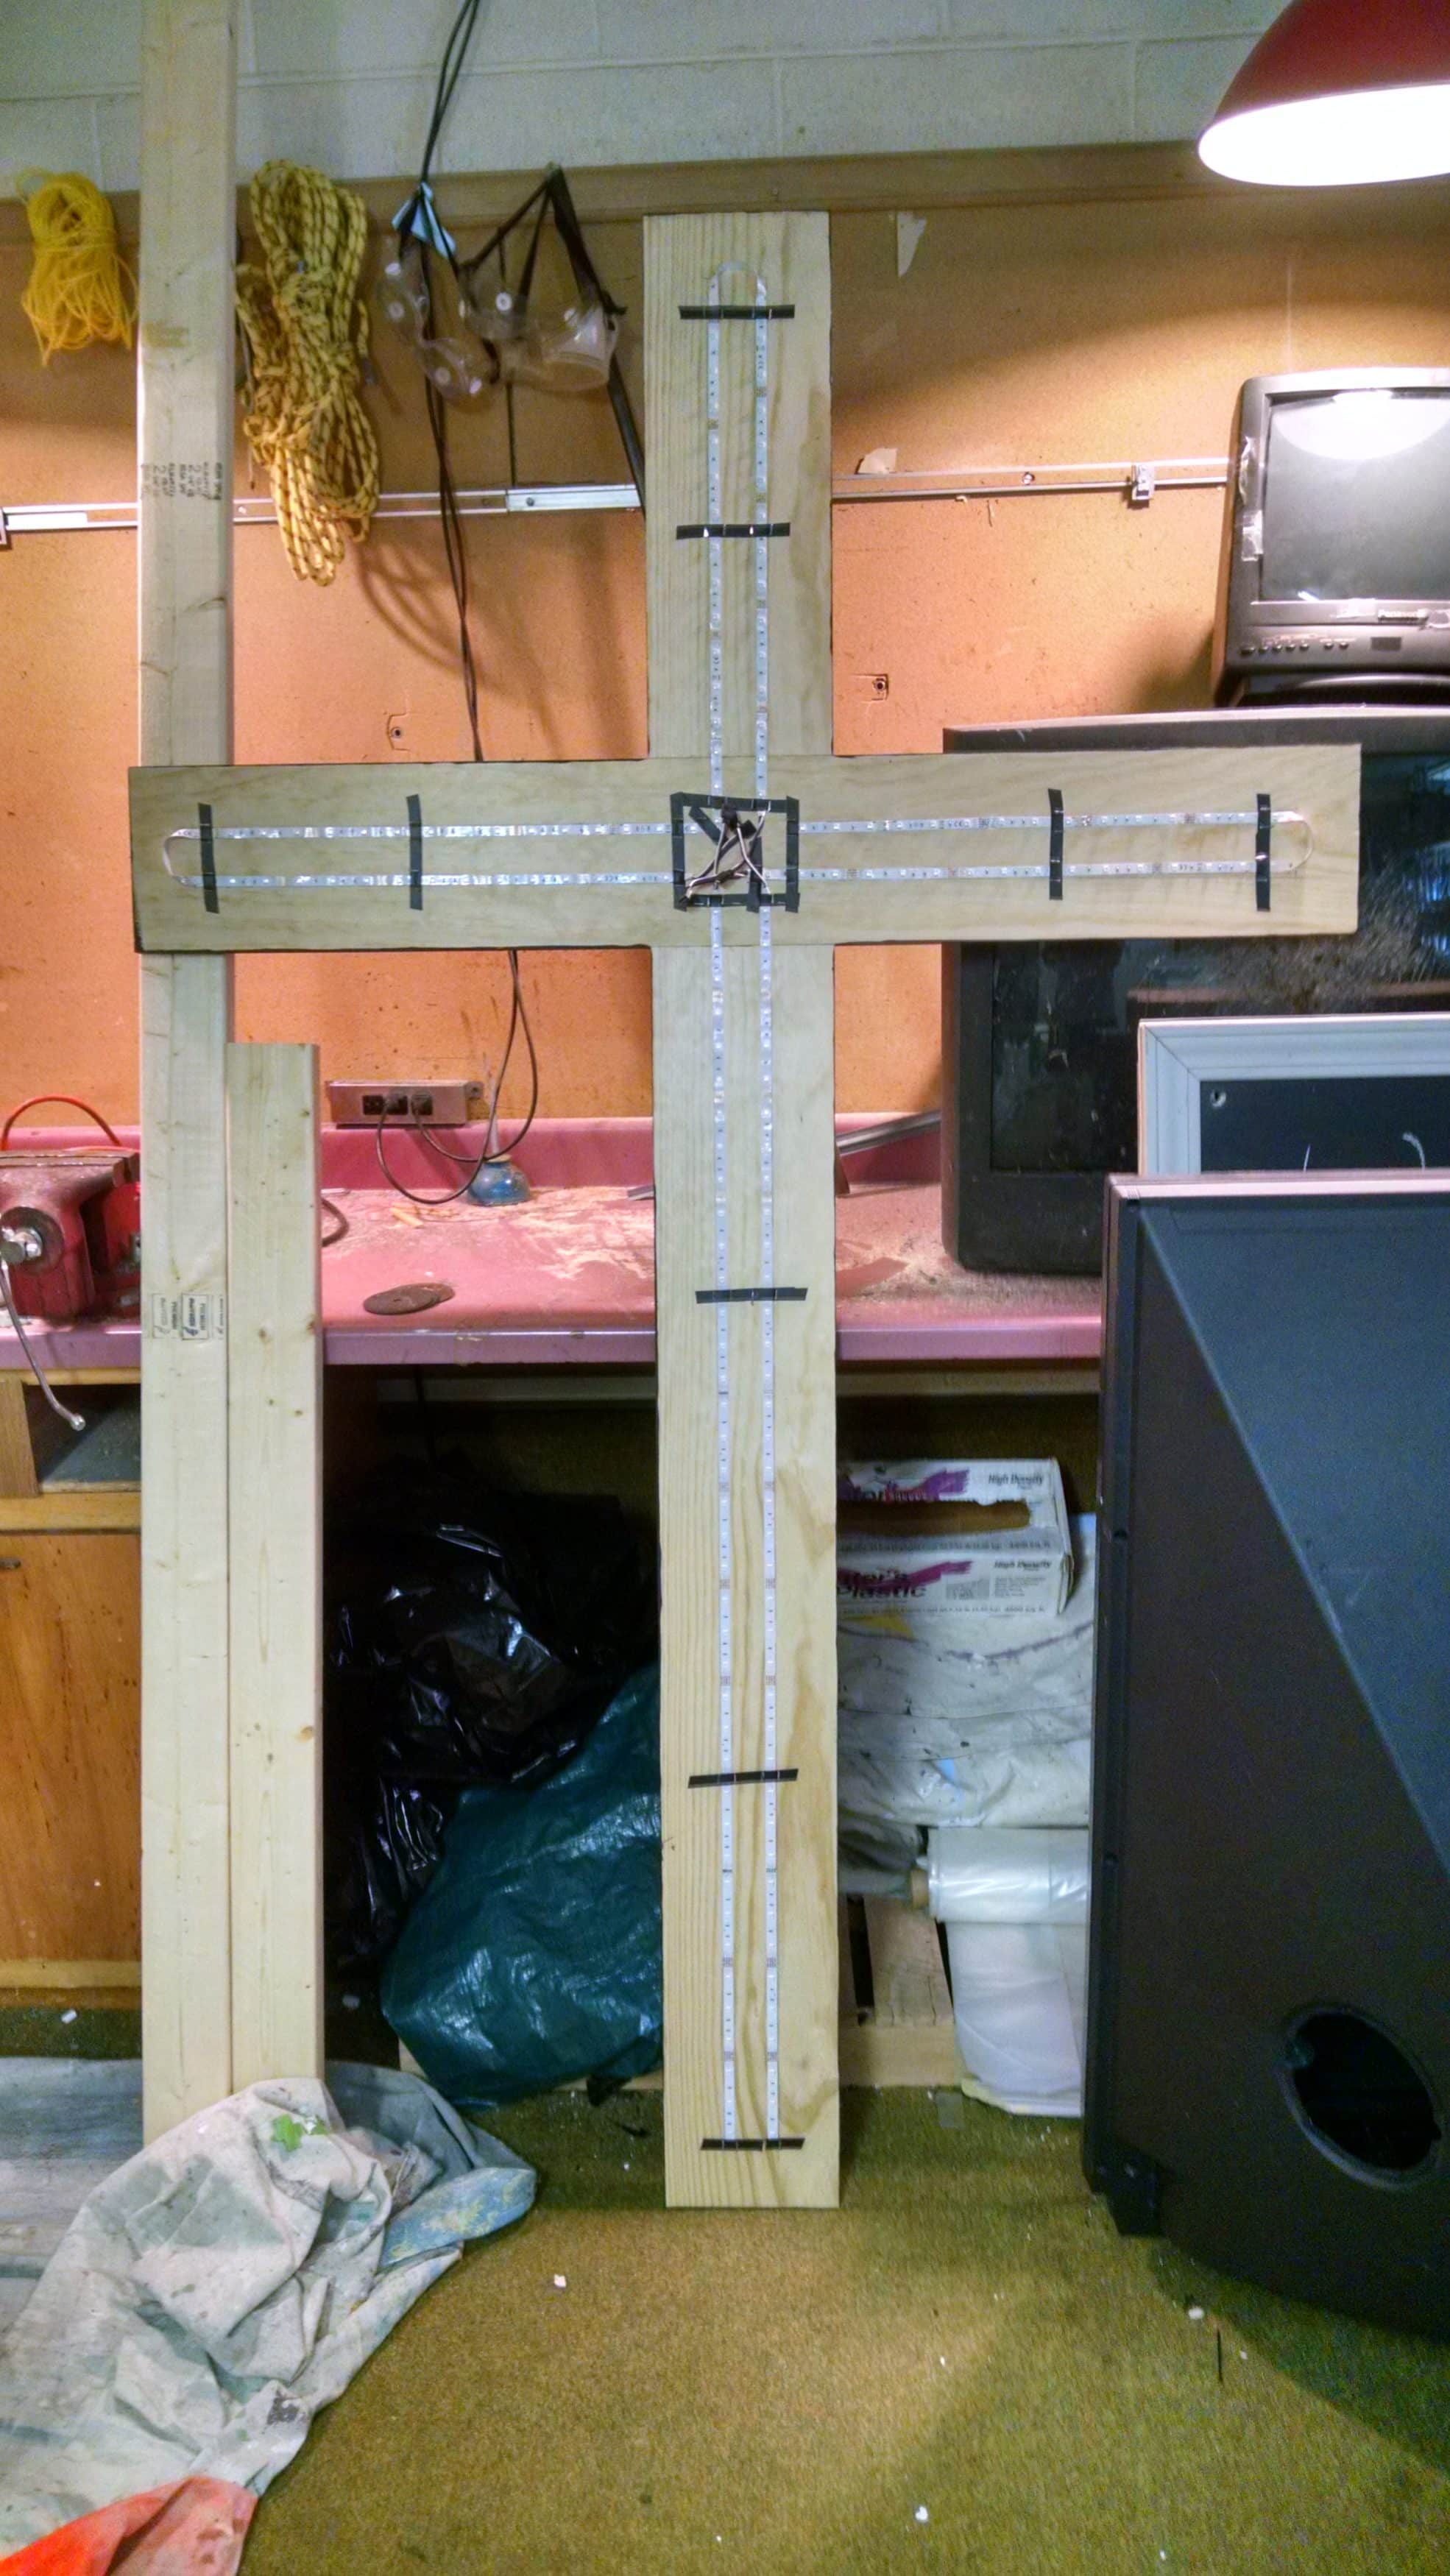
The cross was built from 1×8″ boards. One was six feet tall and the other 4 feet tall put together to build the cross. Once the boards where put together with a 2×4″ board on the back, the front was covered with RGB light strips to allow it to glow and change colors. Black electrical tape was laid on the lights to ensure that if the adhesive on the lights failed, the electrical tape was there to support it. Translucent Coroplast was used to make the lights in the cross be visible and create the 3D look of the cross.
Each beam of light coming from behind the cross was a twelve foot 1×2″ piece of wood painted black with RGB lights taped to the fronts of the boards. Every few feet, black electrical tape was wrapped around the board to ensure the light strips didn’t fall off.
The seven beams and cross were controlled with decoders to allow them to be controlled over DMX, assigned, and controlled with their computer software.
All seven of the beams were screwed to a four foot piece of 1×12″ board painted black, mounted to two T-shaped supports, elevated a foot off the ground, and screwed to the stage floor.
The cross was mounted to a six foot tall 2×4″ board mounted to a T-shaped support screwed to the stage floor.
The two truss on the sides were used to help support the beams. RGBA pars were mounted to the tops and bottoms of the truss to make the truss glow. A par was clamped to the side of each truss aimed at the ceiling. Four pars were on the floor in front of the cross, aimed at the ceiling, with a diffuser gel on them to spread the light. Two RGB+UV light bars were placed behind the cross and beams to flood the back curtain and add extra light.
From wiring, pre-building, to assembling on stage, this project took about four days with one person doing most of the pre-planning, wiring, and pre-building; and two people doing the assembling on the stage.
For materials such as: lumber, paint, light strips, decoders, power supplies, and Coroplast; the cost was around $470.
Links to online items purchased:
Creating a Dynamic LED Cross Stage Design
This stunning LED sunburst cross design from Faith Center demonstrates how thoughtful lighting and strategic construction can transform a simple wooden cross into a powerful worship focal point. The radiating beams of light create a visual metaphor that resonates deeply with congregations—the light of Christ emanating outward to illuminate the surrounding space. What makes this design particularly effective is the combination of direct illumination on the cross itself and the dramatic backlighting that creates a halo effect around the entire structure.
The construction approach used here offers several advantages for churches with volunteer build teams. By building the cross from standard dimensional lumber and covering it with translucent Coroplast, the team created a durable structure that diffuses the LED light evenly across the surface. The Coroplast material is lightweight, inexpensive, and readily available at most sign shops or home improvement stores. Its translucent properties allow the vibrant RGB colors to shine through while hiding the individual LED diodes that would otherwise create harsh hotspots.
The seven radiating beams are the true stars of this design, creating the sunburst effect that gives the project its name. Each twelve-foot beam extends outward from behind the cross, suggesting light rays emanating from the central symbol. The use of black-painted wood for these beams is a clever design choice—during services when the lights are active, the beams themselves virtually disappear, leaving only the glowing light strips visible. This creates the illusion that beams of colored light are floating in mid-air, adding a magical quality to the worship environment.
From a technical perspective, the DMX control system allows for incredible versatility in how this design is used throughout different services and seasons. The RGB light strips can be programmed to display static colors that match your church’s branding, slow fades that create atmosphere during worship, or dynamic chases that add energy to celebratory moments. The addition of RGBA pars on the trusses and the RGB+UV bars behind the cross means the entire stage can be coordinated through a single lighting console, creating cohesive looks that transform the entire worship space.
The four-day build timeline is realistic for most church volunteer teams, especially when work is spread across multiple weekends. Having one person handle the technical aspects like wiring and soldering while others manage construction and painting allows team members to work within their skill sets. The modular nature of the design—separate cross and beam assemblies—means components can be built in a workshop and then transported to the sanctuary for final assembly, minimizing disruption to regular church activities.
For churches considering a similar design, the $470 material cost represents excellent value for the visual impact achieved. The professional appearance of the finished piece belies its modest budget, proving that effective stage design doesn’t require expensive equipment or professional installation. With proper care and storage, this LED cross can serve your church for many years, providing a flexible backdrop that adapts to different sermon series, seasons, and special events.
Related Designs
- Acrylic LED Cross – A modern cross design featuring LED tape lighting behind acrylic panels for a sleek, contemporary worship focal point.
- Light Chimes – A creative PVC pipe design featuring illuminated hanging tubes that create ethereal lighting effects perfect for worship.
- Versatile Brilliance – Custom LED fixtures built using lumber and LED tape lighting for flexible stage illumination options.
- LED Lighting + Haze – Discover how combining LED fixtures with atmospheric haze can dramatically enhance your lighting effects and create stunning visual environments.
- Coro Wall – Explore how corrugated plastic panels can create beautiful translucent lighting effects similar to the Coroplast used in this cross design.
Pro Tips for LED Cross Designs
Plan Your Wiring Carefully: Before assembling your LED cross, map out your wiring routes to ensure clean cable management. Group wires by function (power, data, ground) and use cable ties to keep them organized. Leave extra slack at connection points to prevent strain on solder joints when the structure is moved. Label everything clearly—future-you will thank present-you when troubleshooting or making modifications.
Test Before Final Assembly: Always test your LED strips and connections before permanently mounting them to your structure. Power up each section individually to verify all pixels work and colors display correctly. It’s much easier to fix wiring issues on a workbench than when everything is assembled on stage. Create a simple test sequence that cycles through red, green, blue, and white to verify full functionality.
Consider Power Supply Placement: LED strips can draw significant power, especially in long runs. Position your power supplies as close to the strips as possible to minimize voltage drop, which causes color inconsistency and dimming at the far ends. If your cross is large, consider injecting power at multiple points rather than just one end. Use a power calculator to ensure your supplies can handle the total wattage of all connected strips.
Secure Connections for Longevity: The constant handling and movement of stage elements can loosen connections over time. Use heat shrink tubing over solder joints and consider adding strain relief at cable entry points. For DMX connections, use locking XLR connectors if possible, or secure standard connectors with electrical tape to prevent accidental disconnection during services. A few minutes of extra securing during build can prevent embarrassing failures during worship.


Related: Checkered Past – A geometric grid design using black frames and white ceiling tiles for a bold, high-contrast stage backdrop.
Related: Purple Spread – A stunning wall transformation using draped fabric panels, purple LED uplighting, and natural elements for Easter and Lent services.


Hey lance its prit here coming back at you for the lovely design
Thanks a lot Prit, glad you find it lovely.
Search up ‘Wirey Frames’ to see my previous design.
Looks awesome! Does each light need it’s own power supply or is there some way to daisy chain the power?
Thanks a lot Micah.
Each decoder needs to have its own power supply.
Quick question about this. Is the coroplast formed in a box around the cross?
The coroplast was formed by being bent into a three dimensional shape then stapled at the edge to a 1×8 board in a cross shape. The coroplast was measured then cut and bent at the measured spots. No box was used in forming the coroplast. Hope that helps.