


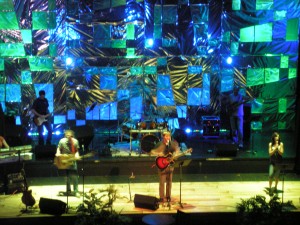
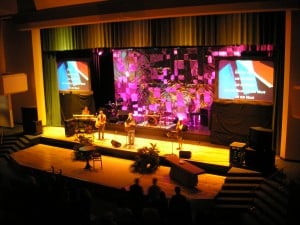
My, oh my, is this stage bright! Jarrod DellaChiesa brings us this set for the young adults service at Neighborborhood Church of Castro Valley in California.
The set was built out of 6 wooden window frames covered with mylar. The windows were created and covered with loose 8mm frosted plastic. The set was then lit in front and from behind to create a multitude of looks.
Blue industrial lights were hung from above to add to the look.

Planning a Reflective Window-Frame Backdrop
The visual strength of Shine comes from repeating a simple window shape while giving light more than one surface to interact with. The original design combines reflective mylar, frosted plastic, and illumination from opposite directions. To adapt that idea, begin with a small sample rather than covering every frame immediately. A test panel lets your team compare reflection, diffusion, and color before committing materials or volunteer time. The suggestions below are adaptations to try, not additional specifications from the original build.
Sketch the frame arrangement against your actual stage dimensions. Include the drum enclosure, music stands, speaker positions, and any projection screens. Keep a clear outline around the speaker’s position so the brightest reflections do not compete with faces. Six frames do not have to form an evenly spaced wall: pairs, staggered heights, or a central opening can create depth while leaving room for entrances and equipment access. Check the layout from side seating as well as the center aisle.
Test the Materials Before Building the Full Set
Reflective film and translucent plastic behave differently. Mylar can produce sharp highlights, while a frosted surface can soften light passing through it. Use your sample to decide which effect each frame should contribute. Change one variable at a time: material tension, fixture angle, or distance behind the panel. Record the version you prefer with photographs and simple notes so volunteers can reproduce it across the remaining frames. Do not assume that every product sold as frosted plastic will transmit the same amount of light.
Before purchasing, list the timber, film, plastic, fasteners, mounting hardware, and lighting already available to your team. Price a single complete frame, including its support, before multiplying the estimate. Reusing sound frames may reduce material needs, but inspect joints and edges first. Ask your venue’s responsible facilities or safety professional to review material suitability and installation, especially where plastic film and suspended elements are involved. Decorative frames are not load-bearing rigging points.
Build Lighting Looks Around Contrast
Start your lighting session with the room in its normal service conditions. Bring up the rear light alone, then the front light alone, and finally combine them. This makes it easier to identify whether a distracting hotspot comes from a direct beam or a reflection. Aim reflective surfaces away from the congregation and camera lenses, and keep film clear of fixtures according to manufacturer instructions. A little brightness may be enough when the surrounding stage is dark.
Save a small set of repeatable cues rather than relying on constant movement. Try a quiet single-color look for speaking, a contrasting front-and-back combination for music, and a restrained transition between them. Review each cue on the actual camera feed as well as in the room. Shiny surfaces can clip to white on video even when they appear colorful from the seats. Photograph the final setup and label frame positions to simplify the next installation.
Pro Tips for Mylar and Frosted-Plastic Stages
- Check every viewing angle: Walk the seating area with the lights running. Adjust the frame or fixture angle if a bright reflection lands at eye level or washes out the camera image.
- Make assembly repeatable: Label frames, supports, and attachment locations. Keep a small sample of the chosen material with the setup notes so replacement panels match the existing finish.
- Separate scenery from rigging: Have a qualified person specify supports and any overhead attachments. Maintain access routes, and never use thin film or decorative frame joints to carry lighting equipment.
- Protect the finish in storage: Store panels so reflective faces cannot rub against exposed screws or rough timber. Test handling and packing with one panel before your team transports the complete set.
Related Designs
- Offset – Explore separated scenic panels, wooden flats, and a layered lighting backdrop.
- Triangle Wall – Compare front projection with backlit translucent edges in a geometric set.
- Tilted Rectangles – See how repeated shapes and varied angles change a simple backdrop.
- A Couple Notes – Find another application of vertical mylar panels in a music-themed stage.
- Neon Jesus – Explore another stage design that uses mylar alongside other scenic elements.
Related: Jesus, Light it Up – Compare an illuminated Jesus sign with a Coroplast backdrop and textured, color-lit metal-screen columns.
Related: Stained Paper Panels – Compare printed backlit paper on black wooden frames for a stained-glass-inspired church stage backdrop.


Jarrod, way to be absolutely awesome! This looks phenomenal. Way to go!